Wireless Fusion Window Paintings 2015
A Window Painter’s Portfolio
My work as a window painter in Fall and Winter takes months to organize. The seasonal paintings I create for holidays are documented step by step as the designs are created and the finished product is detailed. The images stack up to hundreds of picture files. The task of organizing a gallery and photo journal takes many weeks and months to create order out of chaos.
Often, I do pencil sketches from these photos and set them aside in a portfolio binder. My best work is then printed and added to this folder. The digital images are processed in a different manner. My current image galleries number in the thousands. That is a lot of images to sort through when looking for a particular image or design piece. But how do you organize and find anything in all of these images?
The first question you may ask is why do I take so many pictures? The images are study material. They are examples of my work and content images for my writings. Inside each photocell are the results of painting trial and success over decades. They are the process of the art. The photo is the documented history of an image that will only linger for a few weeks and be destroyed when the holiday is over.
Photographs are the only way to preserve this type of art. Eventually, these images will be applied in acrylic on canvas for permanent pieces and in gallery displays of talent. They are studied for further enhancement and are the markers of this artist’s history. A photo journal of this type needs to be categorized and images titled and tagged for optimum organization.
How The Galleries are Organized
Organizing a computer photo gallery is tedious work and time-consuming. First, a file folder is created for the subject matter – in this case, window painting. The file is then divided into assorted images that are similar or that were taken in the same period. I keep a record of individual clients I have painted for and divide that into separate holiday works. and the year created.
A copy of each character, scene or holiday icon is transferred to a file for the best images of the project. Snowmen go in snowmen folder, wreaths go in the wreath folder etcetera, etcetera. A “best of file” is created for not only the best-painted image but best photograph. This file is dual purpose. It is a quick access folder for images that will be saved to CD and preserved against computer failure or deletion. I have lost many a favorite photograph through a hard drive crash or corrupted motherboard. I would like to hang onto these images.
This “best of file” are images that represent my highest quality window painting artwork. It is my digital portfolio. I can use them on flyers, in demonstrations for students, and for just plain showing off my talents. They will be printed as 8″ by 10″ glossy photographs and framed as well as stored in a portfolio binder. They are the ones I show my new clients and with these images in hand, I can create new images using the details of the designs I have already produced. They help me evolve my paintings and increase the quality of my artwork.
These screen shots below are the processes I use to organize and sign each photo. There is a back file in each picture that contains details that allow for the image to be fetched in a general search. Tags, titles, and notes may be added as well as author name and other information. Right click on any photograph in your picture gallery and you will see what I am talking about. It is possible to title and tag several photos at the same time by selecting them and using the box at the bottom of the screen insert the information and save.
Organizing Individual Photos for Search and Signing
Open your pictures folder and right click the mouse button any image and a drop-down menu will appear. The properties option will be on the bottom of this list. Click on this selection and a box will open. Properties are the specific characteristics of the file.
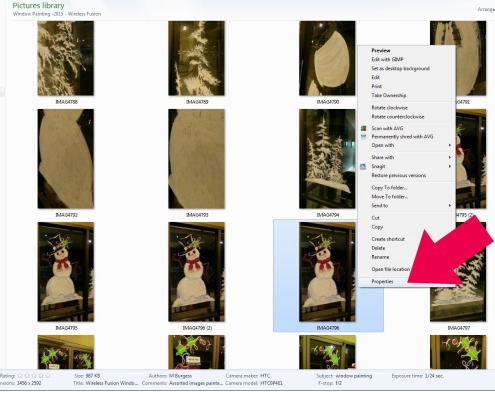
Right-click an image for properties menu
Next, go to the top menu and find the Details tab. (PLEASE NOTE: I do not change anything on this front page in properties. Doing so might interfere with the security of the file or the ability to share or edit the image.)
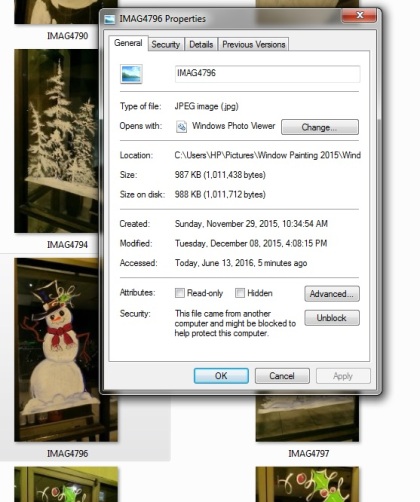
Properties Features
From the Details Menu, a variety of information is available for editing. The camera used will show as well as other information. Change what details apply to the image and sign it with the name of the photographer. Remember to add information about copywriting in the notes section. Add something like All Rights Reserved. It is important people know this is your work when the search engine shows them your picture. It can also help you find the images you have already edited for search optimization.
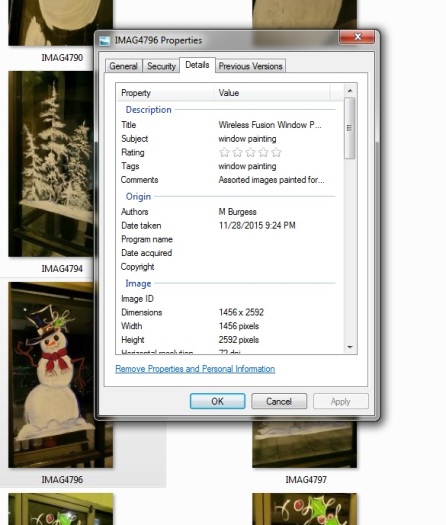
Properties Details – Edit Choices
If you look at the bottom of your folder gallery, there is a strip of information. These are property values of the folder itself and its contents. There are options for changing titles and tags and the author and subject here. Use the control button on your keyboard and click carefully on several images at the same time. The author name and other details can be changed in bulk at the same time. Again, do not forget to hit the save button. If you click back on the screen the information will undo itself. Save, save, save!!!

The Lower Properties’ Strip
How All This Information Applies to Search Assistance and Copywriting Photos
For a quick reference, if I want to find snowmen on my computer, I need only type that word into my search engine box and the images that were tagged properly will populate in the search area. I pick the one I need to work with and get on with my project. I do not have to find the folder or photo and spend valuable minutes on a wild goose chase or a null result. The computer will do that for me if I have properly edited the image.
This process helps me also copyright my images. For the record, I would highly appreciate it if my artwork is not copied. It is years of painstaking study and inspiration. I am kind of selfish that way. This is the purpose of my book. If I teach the process of creating your own images and scenes, maybe artists won’t copy mine… anyways, thanks for reading. I have about a thousand more photos to edit and organize.
For more on my work and window painting, in general, see the following links:
http://christmas-windows.blogspot.com/
http://hubpages.com/holidays/Christmas_Art_Painter

