Organizing a Window Painting Gallery

Wireless Fusion Window Paintings 2015

Wireless Fusion Window Paintings 2015

A Window Painter’s Portfolio

My work as a window painter in Fall and Winter takes months to organize. The seasonal paintings I create for holidays are documented step by step as the designs are created and the finished product is detailed. The images stack up to hundreds of picture files.  The task of organizing a gallery and photo journal takes many weeks and months to create order out of chaos.

Often, I do pencil sketches from these photos and set them aside in a portfolio binder. My best work is then printed and added to this folder. The digital images are processed in a different manner. My current image galleries number in the thousands. That is a lot of images to sort through when looking for a particular image or design piece. But how do you organize and find anything in all of these images?

The first question you may ask is why do I take so many pictures? The images are study material. They are examples of my work and content images for my writings. Inside each photocell are the results of painting trial and success over decades. They are the process of the art. The photo is the documented history of an image that will only linger for a few weeks and be destroyed when the holiday is over.

Photographs are the only way to preserve this type of art. Eventually, these images will be applied in acrylic on canvas for permanent pieces and in gallery displays of talent. They are studied for further enhancement and are the markers of this artist’s history. A photo journal of this type needs to be categorized and images titled and tagged for optimum organization.

How The Galleries are Organized

Organizing a computer photo gallery is tedious work and time-consuming. First, a file folder is created for the subject matter – in this case, window painting. The file is then divided into assorted images that are similar or that were taken in the same period. I keep a record of individual clients I have painted for and divide that into separate holiday works. and the year created.

A copy of each character, scene or holiday icon is transferred to a file for the best images of the project. Snowmen go in snowmen folder, wreaths go in the wreath folder etcetera, etcetera. A “best of file” is created for not only the best-painted image but best photograph. This file is dual purpose. It is a quick access folder for images that will be saved to CD and preserved against computer failure or deletion. I have lost many a favorite photograph through a hard drive crash or corrupted motherboard. I would like to hang onto these images.

This “best of file” are images that represent my highest quality window painting artwork. It is my digital portfolio. I can use them on flyers, in demonstrations for students, and for just plain showing off my talents. They will be printed as 8″ by 10″ glossy photographs and framed as well as stored in a portfolio binder. They are the ones I show my new clients and with these images in hand, I can create new images using the details of the designs I have already produced. They help me evolve my paintings and increase the quality of my artwork.

These screen shots below are the processes I use to organize and sign each photo. There is a back file in each picture that contains details that allow for the image to be fetched in a general search. Tags, titles, and notes may be added as well as author name and other information. Right click on any photograph in your picture gallery and you will see what I am talking about. It is possible to title and tag several photos at the same time by selecting them and using the box at the bottom of the screen insert the information and save.

Organizing Individual Photos for Search and Signing

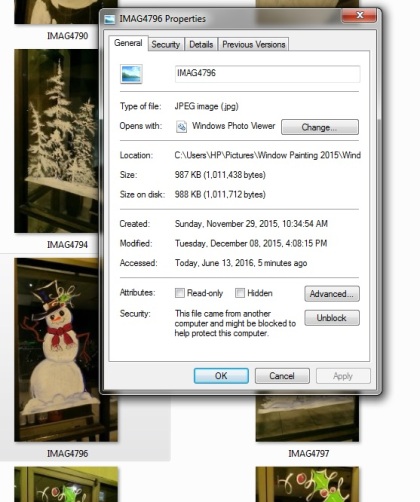
Open your pictures folder and right click the mouse button any image and a drop-down menu will appear. The properties option will be on the bottom of this list. Click on this selection and a box will open. Properties are the specific characteristics of the file.

Image Properties Screenshot - snowman - properties arrow

Right-click an image for properties menu


Next, go to the top menu and find the Details tab. (PLEASE NOTE: I do not change anything on this front page in properties. Doing so might interfere with the security of the file or the ability to share or edit the image.)


Properties Box

Properties Features


From the Details Menu, a variety of information is available for editing. The camera used will show as well as other information. Change what details apply to the image and sign it with the name of the photographer. Remember to add information about copywriting in the notes section. Add something like All Rights Reserved. It is important people know this is your work when the search engine shows them your picture. It can also help you find the images you have already edited for search optimization.


Propeties Detail Image

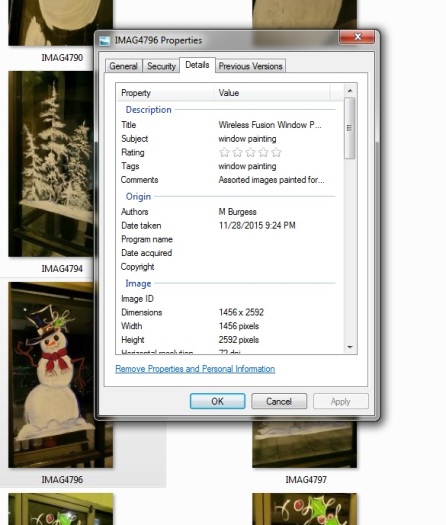
Properties Details – Edit Choices

If you look at the bottom of your folder gallery, there is a strip of information. These are property values of the folder itself and its contents. There are options for changing titles and tags and the author and subject here. Use the control button on your keyboard and click carefully on several images at the same time. The author name and other details can be changed in bulk at the same time. Again, do not forget to hit the save button. If you click back on the screen the information will undo itself. Save, save, save!!!

Properties Lower Strip Details

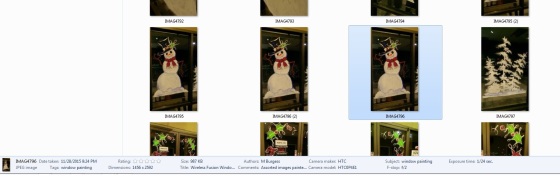
The Lower Properties’ Strip


How All This Information Applies to Search Assistance and Copywriting Photos

For a quick reference, if I want to find snowmen on my computer, I need only type that word into my search engine box and the images that were tagged properly  will populate in the search area. I pick the one I need to work with and get on with my project. I do not have to find the folder or photo and spend valuable minutes on a wild goose chase or a null result. The computer will do that for me if I have properly edited the image.

This process helps me also copyright my images. For the record, I would highly appreciate it if my artwork is not copied. It is years of painstaking study and inspiration. I am kind of selfish that way. This is the purpose of my book. If I teach the process of creating your own images and scenes, maybe artists won’t copy mine… anyways, thanks for reading. I have about a thousand more photos to edit and organize.


For more on my work and window painting, in general, see the following links:

www.holidaywindowpaint.com

http://christmas-windows.blogspot.com/

http://hubpages.com/holidays/Christmas_Art_Painter

the essential window painting guide book cover

The Essential Window Painting Guide


Candy Canes And Reindeer Holiday Designs

candy cane reindeer flag Image Amazon
Candy Cane Reindeer Flag – Amazon

Candy Canes and Reindeer combine beautifully in this Holiday design. 

In Holiday window decorating certain elements can be used together for your original paintings and style.

I love the dark background on this design. It brings out the red in the candy cane stripes and the reindeer’s nose quite nicely. Holiday designs like this one incorporate several ideas into a personal signature for an artist. Adapt your style using several elements that traditionally represent the holiday you are decorating for.

In creating panel designs for awkward windows, a solid color layered with a really cute image may be just the thing for decorating. I wouldn’t use this on a main storefront. Shop keepers and clerks need to keep an eye on pedestrians coming and out of a business. I would use this style for the lower portion of a door. Use a design like this to tie in your whole scheme.

I love this little reindeer’s smug smile. It is like he knows what Santa is bringing you and it is a gift you will totally love! The accents of candy cane stripping is very creative.  It demonstrates several patterns that can be useful when you design your striped candy borders or touches. These colors blend very well together.

Taping this design off would be your best course of action. Start with the large rectangular back ground then add a tape guide to the candy cane stripe border. In this method you would be able to paint straight lines easily. Pull the tape off afterwards and you have smooth lines in your image.

I would begin painting with a white base where I wanted the reindeer then fill the rectangle in with black. It might be helpful to set a blotch of white where the stars are but in a window design you can scrape a small shape into the paint when it dries and allow the interior light to shine through it.

For more info on holiday window painting see: So, You Want To Paint Holiday Windows? on Squidoo

What other elements do you see in this Holiday design that may be adapted and used for window painting?


Traditional Holiday Art Designs And Fluorescent Tempera

Poinsettia Designs 2007 ~ Image: M Burgess

Create A Collection Of Holiday Art Designs!

When the Holiday season rolls up on us in full force, my fellow artists and the curious, do you have a collection of drawings or photos to pull design ideas from for window decorating? 

Create a sampler book using the traditional shapes and images from the holiday designs that are so dear to our hearts.

My standard design theme over the past few seasons has been poinsettias and candles. These evolve year after year into wonderful adaptations. I am an artist with styles that are cartoon-like to semi realistic. I haven’t been properly schooled in the art terms, but I paint what I paint. 
There are moments I have scheduled my paint box for an appointment and I am not sure what it is I will be painting. Thankfully I have my standard design images. Created long ago when I started learning how to do these art projects I sat down and did dozens of pencil sketches. The window will inspire me to pull in and arrange these delightful images. When the design comes around and I am ready to sketch in the elements, there is usually a nice giggle involved with it. Sometimes there is an inside joke. Mostly they are a testimony of how beautiful this time of year is.

Christmas Art- Poinsettia In Fluorescent

Holiday Window Designs 2012 ~ Image: M Burgess
My 2012  Christmas Poinsettias are shown here.
I chose fluorescent tempera paints  to create a vivid image with the flower petals of this poinsettia. The brush strokes add the touches I needed to give it shape and form. With this design there is no need to do anything more but outline it.
Fluorescent colors can add some very nice touches for highlighting and blending in images that are round in contour. Use them to outline, too.
Keeping in the tradition of the Holidays, try to stay as close to the basic colors as possible but be creative!
Happy Holidays!


For More See: So, You Want To Be A Holiday Window Painter?


What is your favorite holiday decoration design?

Before Painting Glass

Washing windows is part of the job and one of the features of your excellent service!

Become an expert in no time with these helpful window washing tips. It’s good business sense to leave sparkling clear glass behind before and after you have decorated!

Window Washing ~ Lessons From A Transparent Technician

Transparent Technician: the person who cleans glass window panes using a squeegee. Operates at ground level or hangs off of a high-rise building using a mobile scaffold and safety lines. (Window Washer)

Before you apply any paint or sketch to your window panes you have to make sure the surface is clean and the paint will stick.

This is easier to see than explain. The methods for cleaning a window quickly is an art in itself.
Done incorrectly you can make a bigger mess than the one you had when you started. The fanning action of the squeegee is what you need to learn. This lady really has fun with her window washing techniques!


Secret Formula to Clean Windows

Make sure your panes are clean before you start.

The secret to really good, clean windows is Dawn Soap! Use 2-3 drops in the water bucket. Practice with a squeegee and you can whip through the window cleaning quickly.

Make a good impression on the business you are decorating and clean the frames while you are at it. This helps when you dribble a little paint while you work. The surface is already clean and probably a little damp so spills are easy to remove.

Clean Window Kit Tools and Supplies
Having the right supplies ready for clean-up before and after is a great time saver. Plus!! Business owners LOVE it when you leave art and not a mess!
Here is a handy list of window washing tools and supplies:
*
  1. 3 gallon Plastic Bucket with a handle
  2. Squeegee – You can use a professional one like the one in the video. I prefer the automotive style squeegee. With a sponge on them, it makes soaping the window easier. There’s need to carry more equipment than you have to.
  3. A small bottle of Dawn Liquid
  4. Paper Towels – LOTS OF THEM! Bring at least 3 rolls with you. Get the quality ones. You don’t want paper shreds all over the place.
  5. Razor scrapers and replacement blades. Choose the flat edged ones. Purchase a few of them. It’s handy to switch them out in the clean-off process instead of having to stop and clean only one of them. These are great for cleaning up the painting, too. Need a sharp, flat edge? Just scrape off the paint around what you want to trim.
  6. Scrub Brush – Use this to clean up the window frames after you have painted. Scrub spots as soon as they occur to make clean-up easier.
  7. Plastic Bristle Broom and dustpan. Sweep the area under the windows BEFORE you start cleaning. When you are finished, dunk the broom into your soapy water and scrub down the sidewalk where you might have paint dribbles.
When I’m Cleaning Windows
By George Formby
Cute Song and some of the lyrics ARE truly some of the unexpected things that you will see when you are working with your holiday windows.
This song title could just as easily be changed to “When I’m PAINTING windows.”
Have we got these tips down ? Ok, you might be ready to start painting!
 But…
Yes, you guessed it. There is more…
See the Hubpages Article:
Image credit: Morguefile.com Page URL: http://mrg.bz/bl43mQ
 

Painting Tools – Sketch Book

Having an assorted set of sketches is vital to creating your design and organize your portfolio.

Setting your images on paper gives your window clients an idea of what you have to offer them in design choices. By having a complete set of images set on paper you also have a way to demonstrate your talent.

Sketchbooks:

Pre-draw images to use in the holiday theme you are working with. Compile a sketchbook for each of the major holidays.

Sketchbook_Poinsettias_Candles03Detail the sketch for an idea of what the complete image will be when finished so you also have an idea of how you want the image to appear when you paint it. Create single sketch images out of elements you will use for the complete design. An example of Poinsettia and Candles design and Candy Cane w/ Bow is shown.


sketchbook_ candy_ cane_ribbon02


For The Christmas Theme
Sketch these individual images:

Holly Leaves and Berries
Candy Canes
Poinsettia Flowers (My Favorites!)
Candles
Snowmen
Santa (Of Course!)
Reindeer
Stockings                                                                           
Snowflakes
Presents or Gift Boxes
Christmas Trees
Ornaments
Bows
Bells
Teddy Bears
Dolls

With these single images, you can create a host of designs.

A Christmas Wreath incorporates several holly leaves and a bow for a colorful decoration on a door top. Holly leaves can trim and decorate difficult window areas and accent your greeting scene.

Create the sketches first, then add photos of your finished designs to create your portfolio!


For additional information see: So, You want to paint Holiday Windows? or visit the site: Holiday Window Paint.com

Images: M Burgess